开源可视化页面框架GrapesJS开发教程(四)- 创建 Block
本文是介绍可视化页面构建工具 GrapesJS开发教程系列篇之组件介绍,本系列主要是介绍GrapesJS以及与如何对接GrapesJS,如何与CMS整合等相关内容。
如果需要对GrapesJS开发还没有完全了解,可以参考我们之前的相关文章,本篇主要介绍如何在GrapesJS里面创建一个Block。

GrapesJS的组件介绍
GrapesJS 的组件是指包含有关元素在画布中如何呈现(由 View 管理)以及其最终代码,所有 Model 属性都会反映在 View 中。GrapesJS 支持添加各种自定义组件,也内置了常用的基础组件,例如区块、文本、图片等。
GrapesJS 里开发组件,首先需要弄清楚两个核心概念:Component 和 Block。
Component 定义了一个组件的标签是什么,有什么属性、方法、在Canvas里如何展示,保存为HTML时又应该是什么结果。
Block 可以理解为是一个或多个 Component 组成的“代码片段”。
通常而言,用户在组件库里看到的东西就是Block,在用户将Block拖动到Canvas里之后,Grapes JS会经由解析器将它们转换成Component,这时候用户如果要编辑组件的样式、内容、属性等,就变成和Component交互了。
GrapesJS的Block构建
GrapesJS 的Block主要由BlockManager管理,创建好Block之后,就可以进行拖拽到GrapesJS的界面中来使用和编辑。
1. 创建自定义Block
代码文件是 component.ts,主要是 ngOnInit 触发后的事件,具体代码如下:
  createBlockTemplateConfirmation () {
   const selected = this.editor.getSelected();
   let name = this.blockTemplateForm.get('name')!.value
   let blockId = 'customBlockTemplate_' + name.split(' ').join('_')
   let name_blockId = {
     'name': name,
     'blockId': blockId
   }

   createBlockTemplate(this.editor, selected, name_blockId)
   this.blockTemplateForm.reset();
   this.modalService.getModal('createBlockTemplate').close();
 }
createBlockTemplate 方法会调用相关的函数获取component的css和js内容,来看一下 createBlockTemplate的源码,(在index.ts里面)
 export const getCss = (editor, id) => {
 const style = editor.CssComposer.getRule(`#${id}`);
 const hoverStyle = editor.CssComposer.getRule(`#${id}:hover`);

 if (style){
   if(hoverStyle){
     return style.toCSS() + ' ' + hoverStyle.toCSS()
   }
   return style.toCSS()
 }
 else {
   return ''
 }
}

  export const findComponentStyles = (editor:any,selected:any) => {
   let css =''
   if (selected){
     const childModel =  selected.components().models
     if (childModel) {
       for (const model of childModel) {
         css = css + findComponentStyles(editor,model)
       }
       return css+ getCss(editor, selected.getId());
     }
     else{
       return getCss(editor, selected.getId());
     }
   }
 }
  export const createBlockTemplate = (editor:any, selected:any, name_blockId:any) => {
   const bm = editor.BlockManager
   const blockId = name_blockId.blockId;
   const name = name_blockId.name;

   let elementHTML = selected.getEl().outerHTML;
   let first_partHtml = elementHTML.substring(0, elementHTML.indexOf(' '));
   let second_partHtml = elementHTML.substring(elementHTML.indexOf(' ') + 1);
   first_partHtml += ` custom_block_template=true block_id="${blockId}" `
   let finalHtml = first_partHtml + second_partHtml
   const blockCss = findComponentStyles(editor,selected)
   const css = ``
   const elementHtmlCss = finalHtml + css

   bm.add(`customBlockTemplate_${blockId}`,{
     category: 'Custom Blocks',
     attributes: {custom_block_template:true},
     label: `${name}`,
     media: '',
     content: elementHtmlCss,
   })
 }
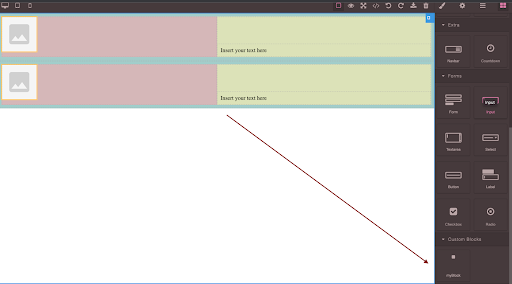
创建好Block之后,Block就会出现在GrapesJS的工具栏里面,然后通过拖拽就可以放到页面编辑区了,参考下图

2. 给Block添加工具菜单
在每一个Block,当鼠标划上去的时候,就会有一个工具栏,用户可以点击这个工具栏做响应的操作,当然有几个是默认的,比如复制、渲染、删除等,此外,我们也可以自定义工具,比如配置,用户点击后,就弹出一个配置框,在配置框里面,用户可以做各种操作。下面的代码就是注册一个选中事件,来触发工具条。
(我们的动态组件就是用这种方式开发的)
   this.editor.on('component:selected', (editor:any) => {
     // whenever a component is selected in the editor
     if (!this.editor) {
       this.editor = editor
     }
     const selectedComponent = this.editor.getSelected();
     if (selectedComponent && selectedComponent.attributes) {
       //createBlockTemplate functionality
       const commandBlockTemplateIcon = 'fad fa-square'
       const commandBlockTemplate = () => {
        // this.modalService.getModal('createBlockTemplate').open(); //Commented for          ………………… now as we have not made Modal yet
       }
        const defaultToolbar = selectedComponent.get('toolbar');
       const commandExists = defaultToolbar.some((item:any) => item.command.name === 'commandBlockTemplate');
        if (!commandExists) {
         selectedComponent.set({
           toolbar: [ ...defaultToolbar, {  attributes: {class: commandBlockTemplateIcon}, command: commandBlockTemplate }]
         });
       }
     }
  });
具体的效果如下:

然后,我们给工具栏点击增加一个弹出框。
#1. 装一个modal box组件
npm i ngx-smart-modal
ng add @ng-bootstrap/ng-bootstrap
#2. 在component文件里面导入表单
   import {NgxSmartModalService} from 'ngx-smart-modal';
   import {FormBuilder, Validators} from '@angular/forms';
下面是Component的源文件
 export class CustomBlockComponent implements OnInit {
 public editor:any = null
 blockTemplateForm = this.formBuilder.group({
   name: ['', Validators.required]
 })
Component的HTML文件 :
<ngx-smart-modal #createBlockTemplate (onAnyCloseEvent)="createBlockTemplate.close()" customClass="nsm-centered"
                identifier="createBlockTemplate">
 <div class="modal-header">
   <h4 class="modal-title"> Are you sure you want to save this block template? </h4>
 </div>
 <div class="modal-body">
   <div>This action cannot be undone</div>
 </div>
 <form (ngSubmit)="createBlockTemplateConfirmation()" [formGroup]="blockTemplateForm" >
   <!-- <app-form-errors [errors]="formErrors()"></app-form-errors> -->
   <div class="col-sm-12 form-group mb-3">
     <label for="name">Name</label>
     <input id="name" type="text" class="form-control" formControlName="name"/>
     <!-- <app-field-errors [errors]="fieldErrors('name')"></app-field-errors> -->
   </div>
   <div class="modal-footer">
     <div class="col-sm-12 form-group page-form-controls">
       <button type="submit" [disabled]="!blockTemplateForm.valid" class="btn btn-primary">Save</button>
       <button (click)="createBlockTemplate.close()" class="btn btn-secondary" type="button">Cancel</button>
     </div>
   </div>
 </form>
</ngx-smart-modal>
Component的CSS文件:
/* You can add global styles to this file, and also import other style files */
/* You can add global styles to this file, and also import other style files */
@import "~ngx-smart-modal/ngx-smart-modal.css";

.nsm-dialog.nsm-centered {
 display: grid;
}
.nsm-dialog-lg {
 max-width: 980px;
}
.nsm-dialog-xl {
 max-width: 1200px;
}
.nsm-dialog-xxl {
 max-width: 1500px;
}
.nsm-dialog-full {
 max-width: 100%;
}
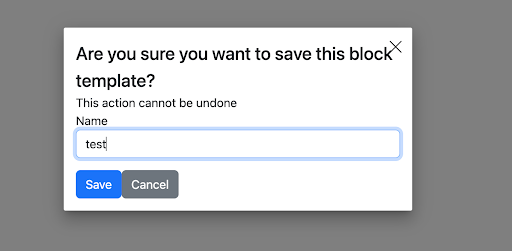
最终,点击工具栏,得到如下效果,

Drupal与GrapesJS的集成演示请点击这里>>
更多GrapesJS开发以及Drupal CMS相关内容,请参考我们其他相关文章,
3、开源CMS Drupal整合可视化构建工具GrapesJS(一)
4、开源可视化页面框架GrapesJS教程(二)- 组件开发
5、可视化页面框架GrapesJS开发教程(三)- 与Drupal CMS整合
6、开源可视化页面框架GrapesJS开发教程(四)- 创建 Block
7、CMS与可视化构建工具GrapesJS整合之动态组件开发(五)

 QQ交谈客服1

